
You open the washer door to start a load, and the first thing that hits you is that stale, swampy smell. The drum looks clean at a glance, but the rubber seal feels slimy, there’s dark grime tucked into the folds, and if you’re getting ready to move out, you start wondering whether a property manager will notice it too.
They usually do.
A proper front loader clean isn’t just about getting rid of odour. In Melbourne rentals, it’s part hygiene, part maintenance, and part bond protection. If you want to know how to clean front loader washing machine properly, the difference comes down to whether you clean the parts often skipped: the gasket folds, the detergent drawer, and especially the drain filter.
Why Your Front Loader Smells and Why it Matters in Melbourne
That smell usually starts in the same place. Front loaders seal tightly, use less water, and hold moisture in all the awkward spots that don’t dry well between washes. The machine can look fine from the front while the gasket folds hide lint, detergent film and mildew.

That matters in Australia because front loaders are now the standard in most homes. Front loader washing machines have over 70% household penetration as of 2023, and for renters the cleaning side matters because mould-related damages affect 25% of rental disputes, while inadequate appliance maintenance contributes to 15% of cleaning disputes in Victoria, with average bond claims reaching $450 per incident in Melbourne suburbs, according to the verified data linked with Whirlpool’s front load washer cleaning guide.
What I see most often in vacate cleans
The usual pattern is simple. A tenant keeps the visible drum clean enough, maybe runs the occasional hot cycle, but never pulls back the rubber seal and never opens the filter panel. By inspection day, the machine smells off, the drawer has built-up sludge, and the filter is holding old lint and grey water.
In Melbourne, that’s a bigger issue than people expect because end-of-lease inspections tend to be detail-driven. Property managers don’t just check floors and ovens. They check appliances for cleanliness and obvious neglect too. That’s why many tenants end up looking for help from services such as End Of Lease Cleaning Melbourne when they realise the washer has been ignored for months.
Practical rule: If your machine smells when it’s empty, the problem isn’t your laundry. The machine itself needs cleaning.
Why Melbourne conditions make it worse
Melbourne homes often deal with damp corners, inconsistent ventilation and shared laundry spaces that don’t dry out quickly. That combination gives mould and biofilm exactly what they want. A front loader that stays shut after each wash turns into a humid box.
The good news is that most washer odours respond well to a proper clean if you hit the right areas in the right order. The bad news is that wiping the door glass and pouring vinegar into the drum isn’t enough on its own.
Gathering Your Eco-Friendly Cleaning Arsenal
You don’t need a trolley full of products. For most front loaders, a short list of basic tools does the job well, especially if you’re trying to keep things eco-friendly and safe for a Victorian household.
The natural kit that actually gets used
Start with the basics:
- White vinegar for the drum, gasket spray, and soaking removable parts.
- Bicarbonate of soda for the wash cycle or for a light paste on stubborn marks.
- A spray bottle so you can mix a simple vinegar-water solution.
- Microfibre cloths for wiping grime without leaving fluff behind.
- An old toothbrush or nylon brush for the gasket folds and filter threads.
- Gloves if you’re dealing with black residue, old sludge or mildew.
- A shallow tray or bowl and old towels for the filter clean, because some water will come out.
For many households, this is enough. It’s low-fuss, easy to rinse away, and it doesn’t leave the heavy chemical smell that can linger in a closed laundry.
If you want broader cleaning advice around vacate prep, the articles on the End Of Lease Cleaning Melbourne blog are useful for the bigger checklist outside the machine itself.
When a commercial cleaner makes sense
Some people prefer a dedicated machine cleaner, especially if the washer has gone a long time without maintenance. The verified guidance allows for Affresh tablets as an option for the hot cleaning cycle on suitable front loaders. That’s handy if you want a measured product instead of mixing your own.
A commercial cleaner can be a good choice when:
- The machine has a built-in Tub Clean cycle and the manual supports cleaner tablets.
- There’s persistent odour after a vinegar clean and you want a second pass.
- You’re cleaning for inspection, and you want a simple, repeatable method.
What not to use
Some products create more trouble than they solve.
- Undiluted bleach can be harsh on seals and isn’t my first choice for routine cleaning.
- Abrasive scourers can scratch plastic parts and roughen rubber.
- Too much detergent after the clean defeats the point and starts residue building up again.
Strong chemical smell doesn’t mean the washer is cleaner. It often just means you’ve added another residue to rinse out.
If your machine’s manual warns against bleach on the seal, follow the manual. For routine care, vinegar, bicarb, hot water, cloths and patience are usually the smarter combination.
The Core Clean for the Gasket and Drum
The part that usually fails a quick visual check is not the stainless drum. It is the grey rubber seal and the film left behind on the door glass. In Melbourne rentals, that sour smell and the black spotting in the gasket are the kind of details an agent notices fast, especially if the machine sits in a closed laundry with poor airflow.
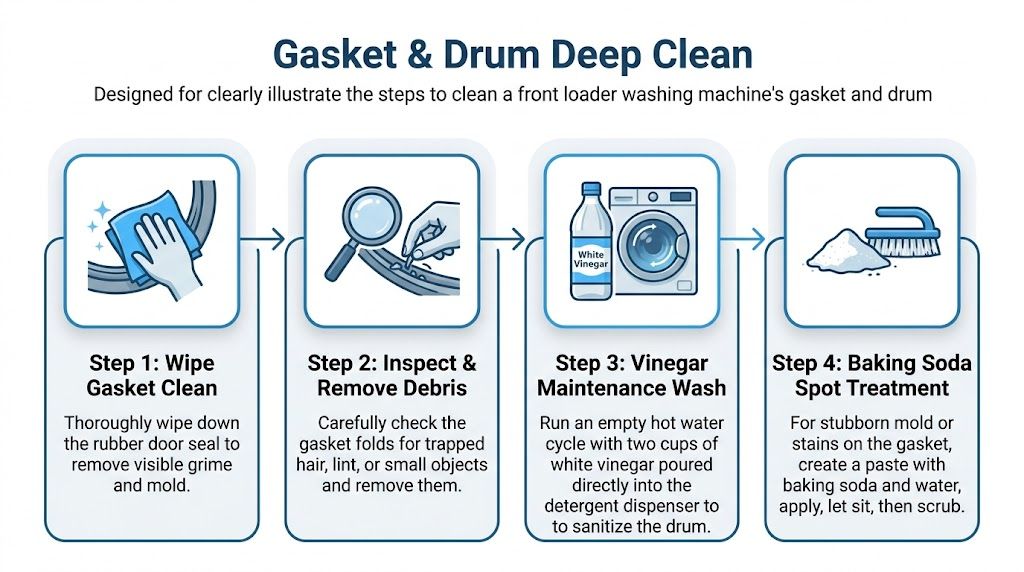
Clean the gasket properly
A front loader gasket has folds for a reason. They hold water back during the cycle. They also trap lint, detergent paste, hair and the sludge that causes the musty smell.
Use this method:
- Empty the washer. Check the drum and pull out any stray items.
- Spray the gasket with a 50/50 mix of white vinegar and warm water. Focus on the inner folds, not just the front lip.
- Leave it for 5 to 10 minutes. That softens residue without soaking the seal for too long.
- Pull back each fold and scrub with a soft nylon brush or old toothbrush. Work right around the seal, then spend extra time on the bottom section where water sits.
- Wipe away loosened grime with a microfibre cloth. Swap cloth sections as they get dirty so you are lifting residue out, not pushing it around.
- Finish with a clean damp cloth, then dry the gasket well.
That hands-on scrubbing matters. Vinegar helps loosen buildup, but it does not remove the gritty layer or black slime by itself.
For light maintenance, vinegar is a good low-tox option for Victorian households that want to keep chemical use down. For heavier mould staining, the trade-off is time. Eco-friendly methods are safer on seals and better for indoor air, but they can need a second pass if the machine has been neglected for months.
Run an empty hot drum cycle
Once the seal is clean, run a hot empty cycle to wash out residue from the drum and the outer tub.
A simple setup works best:
- Use an empty machine
- Choose the hottest cycle your model allows
- Add white vinegar to the detergent compartment if your manual permits it
- Skip extra detergent
- Let the full cycle finish
- Wipe the drum, door glass and gasket dry at the end
Consumer advice from CHOICE on cleaning a washing machine supports regular hot maintenance cleans and wiping moisture out afterwards, which matches what works in practice on front loaders that get heavy family use.
If your washer has a Tub Clean or Drum Clean program, use it. If it does not, pick the hottest long wash listed in the manual.
Hot water handles the hidden residue you cannot reach by hand. The manual clean and the hot cycle do different jobs. You need both if the goal is a machine that smells neutral and looks inspection-ready.
What gets better results
A few habits make a clear difference:
Do
- Clean inside the gasket folds, not only the visible rim
- Use a soft brush that will not rough up the rubber
- Dry the seal and glass after the cycle
- Leave the door ajar so the drum can air out
Skip
- Abrasive pads
- Heavy bleach use on routine cleans
- Closing the door while the seal is still wet
- Assuming one hot cycle will fix built-up grime
If staining is still visible after one clean, repeat the gasket scrub before trying stronger products. For end-of-lease work, that extra pass is usually worth it. A machine that smells clean but still shows black residue around the seal can still look poorly maintained.
Cleaning the Overlooked Filter and Drawer
The filter is where a lot of DIY washer cleans fall apart. People do the drum, maybe the seal, then stop before the one part that often holds the worst mess. If the machine still smells or drains slowly after a hot clean, the filter is usually the next place to check.
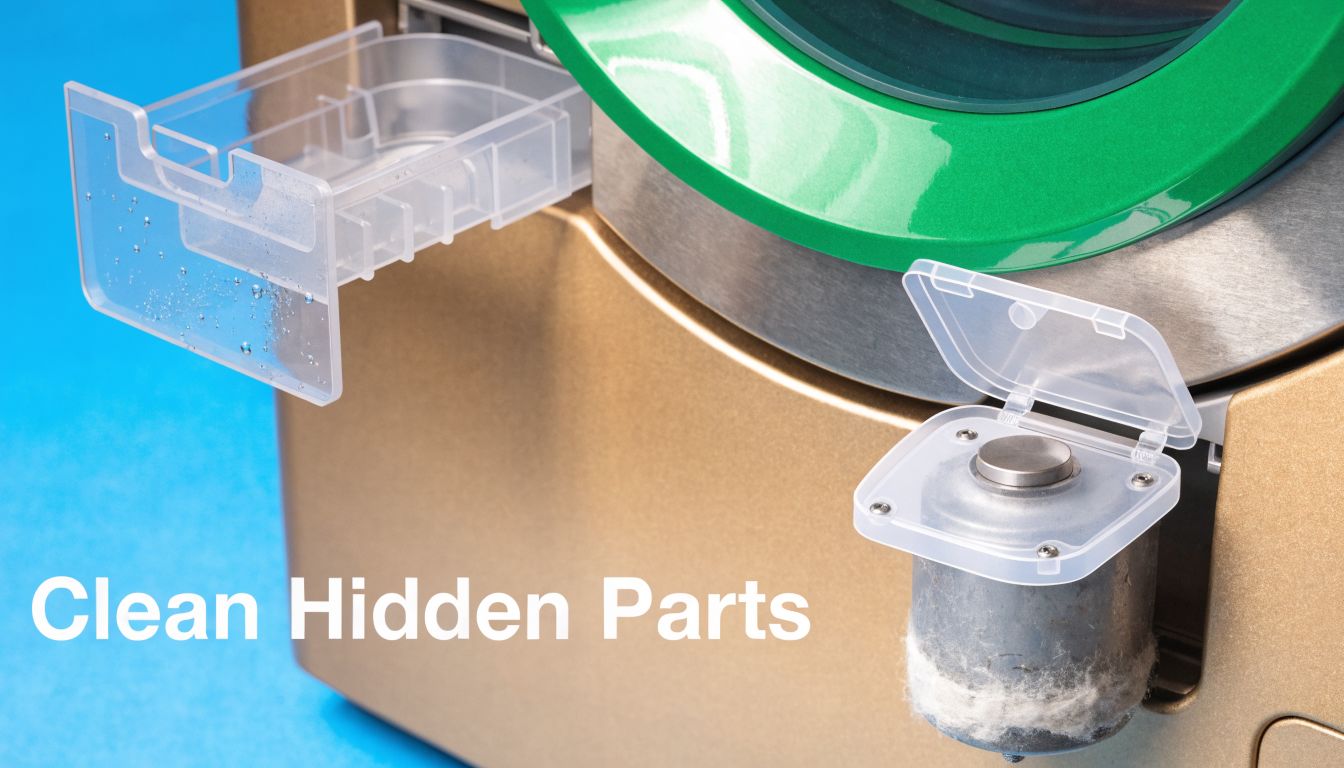
Verified data states that drain filter cleaning in front loaders prevents 75% of AU drainage clogs, and quarterly cleans extend pump life 40%, based on the technical process referenced in this washing machine filter cleaning guide.
Start with the detergent drawer
Before you get to the lower filter panel, remove the drawer. This part collects softened detergent, fabric softener residue and black slime in the rails behind it.
A straightforward method works best:
- Press the release tab and remove the drawer fully
- Soak it in warm water with vinegar
- Scrub corners and siphon caps with a toothbrush
- Wipe inside the drawer cavity before reinstalling
This step matters for end-of-lease cleans because the drawer is visible. A property manager doesn’t need to dismantle anything to notice residue there.
How to clean the drain filter without making a mess
This is the part many tenants put off because they’re not sure where it is or they’re worried about water spilling out. Fair concern. It usually does spill.
Use this order:
- Unplug the machine.
- Place towels and a shallow tray under the lower access panel.
- Open the panel and locate the filter.
- If there’s a drain hose, empty that first into a container.
- Turn the filter counterclockwise and remove it slowly.
- Pull out lint, sludge and any trapped debris.
- Rinse the filter under hot water and scrub it with an old toothbrush.
- Wipe the pump housing and check for anything caught near the impeller.
- Refit the filter snugly and run a rinse cycle.
The biggest mistake is rushing the opening. Go slowly and keep the towels in place. Older machines can hold murky water in that cavity, and it’s rarely pleasant.
If the washer has a sour smell that keeps coming back, check the filter before blaming the drum.
For a visual walkthrough, this short video gives a useful look at the access point and handling:
What tenants often miss at inspection time
The drawer and filter matter because they signal whether the machine has been maintained, not just wiped. A fresh-smelling drum won’t hide a clogged filter full of lint or a drawer lined with old detergent paste.
If your front loader still drains badly, throws drainage errors, or the filter won’t budge without force, stop there. That’s no longer routine cleaning. Forcing a stuck filter can turn a cleaning job into a repair issue.
Your Simple Front Loader Maintenance Schedule
A front loader doesn’t need constant work. It needs a routine. That’s the difference between a washer that stays fresh and one that needs a full rescue clean before inspection.
Verified historical data notes a 35% rise in service calls for gasket mould by 2015, and in Melbourne’s 65% rental market, 22% of bond disputes in 2023 involved unsanitary appliances. The same verified source also notes that post-clean door-propping cuts recurrence 70% and dispenser soaks eradicate 95% residue, as referenced in this front-loading washer maintenance article.
Washing Machine Maintenance Schedule
| Frequency | Task | Benefit |
|---|---|---|
| After every wash | Wipe the door seal and glass, then leave the door ajar | Helps the machine dry out instead of trapping moisture |
| Weekly | Check the gasket folds for lint, hair or small debris | Stops grime building up into odour and mildew |
| Monthly | Run a hot empty clean cycle using the method suitable for your machine | Keeps the drum and internal surfaces fresher |
| Monthly | Remove and soak the detergent drawer | Clears residue before it turns slimy |
| Quarterly | Clean the drain filter and wipe the pump housing area | Reduces the risk of drainage issues |
| Before end of lease | Do a full deep clean of the gasket, drum, drawer and filter | Presents the machine as maintained, not neglected |
The habits that make the biggest difference
Most ongoing maintenance comes down to two habits. Dry the machine after use, and don’t let residue sit for months.
If you only want the essentials, keep this short list on repeat:
- Leave the door ajar after the last load of the day
- Use detergent carefully so excess product doesn’t coat the machine
- Wipe the gasket before grime hardens
- Don’t skip the filter just because it’s out of sight
That’s manageable for everyday living, and it keeps the washer from turning into a move-out problem later.
End of Lease Cleaning When DIY Is Not Enough
Some front loaders respond well to a careful home clean. Some don’t. If the machine has years of neglect behind it, heavy staining in the seal, a persistent rotten smell, or obvious drainage problems, there’s a point where DIY stops being efficient.
That matters most when you’re moving on a deadline. End-of-lease cleaning isn’t just about whether you can clean the washer. It’s whether you can clean it thoroughly enough, along with the rest of the property, before keys go back.
When it’s smarter to bring in help
Professional help is usually the better option when:
- The gasket has long-term mould staining that doesn’t lift after proper cleaning
- The machine still smells after the seal, drawer and filter have all been cleaned
- You’re short on time and still need to finish the oven, bathrooms, walls and floors
- The property manager is known to be strict about presentation and appliance hygiene
A vacate clean is a risk-management job. The washer is only one part of it, but it’s one of those details that can undo an otherwise solid clean if it’s visibly neglected.
A practical decision test
Ask yourself three things.
First, does the washer now smell clean when it’s empty? Second, does it drain normally? Third, would you be comfortable with someone inspecting the seal, drawer and filter area closely?
If any of those answers is no, it’s worth reading a broader vacate preparation guide like this complete Melbourne end-of-lease cleaning guide and deciding whether a professional clean will save you more stress than another DIY attempt.
The expensive part of an end-of-lease clean usually isn’t the cleaning itself. It’s the re-clean, delay, or bond deduction that follows a missed detail.
If you’d rather hand the whole job to professionals, End Of Lease Cleaning Melbourne can take care of the washer along with the rest of your vacate clean, using eco-friendly products and the level of detail Melbourne rental inspections usually demand.
