
You've probably looked inside your kettle, spotted that chalky white ring or crust on the base, and thought, “I'll deal with that later.” Then the next tea tastes a bit off, or the kettle takes longer than it should, or you're doing a final clean before a rental inspection and suddenly every small detail matters.
That's usually when people look up how to descale a kettle with vinegar.
It's a solid method, and one I'd happily use in a normal Melbourne kitchen clean. But the generic versions online often skip the parts that matter: how strong to make the mix, why rinsing matters just as much as descaling, what to do with stubborn scale, and when vinegar isn't the best option for your kettle at all. A kettle can look clean and still fail the taste test. For end-of-lease work, it can also look “not quite finished” if there's residue, staining, or that unmistakable vinegar smell.
Preparing Your Kettle for a Vinegar Clean
A good descale starts before any vinegar goes in. That's not overkill. It's how you avoid splashes, wasted effort, and damage to the kettle finish or base.
If you've got an electric kettle, unplug it first and let it cool. That step is essential. You're working with liquid, heat, and an appliance that sits on an electrical base, so there's no reason to rush this part.
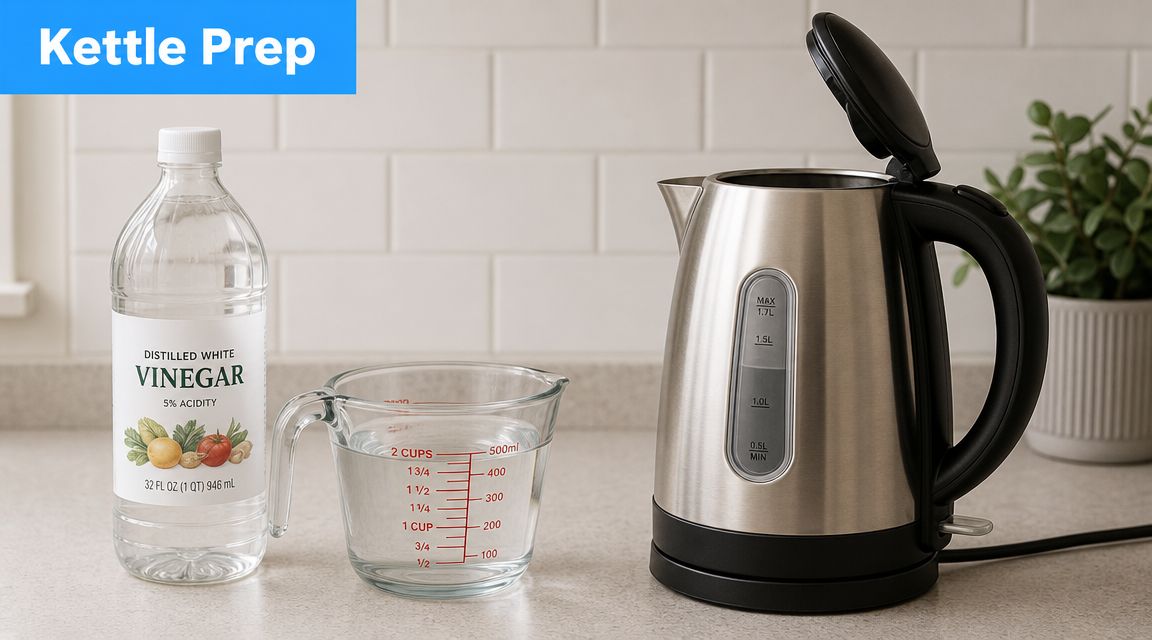
What to check before you start
Open the lid and look properly at the inside. You're checking for three things:
- Light film or spotting. This usually comes away easily with a standard descale.
- Thick crust on the base or around the element area. That often needs a longer soak.
- Loose flakes or debris. Tip them out first so the vinegar solution can touch the scale directly.
If there's old water sitting in the kettle, empty it completely. Don't dilute your mix by accident. I also like to give the inside a quick swill with plain water first, just to remove anything loose.
Keep the setup simple
You don't need a cupboard full of products. For most kettles, gather:
- White vinegar
- Water
- A soft cloth or soft sponge
- A sink nearby for rinsing
Skip abrasive pads. They can mark stainless steel, scratch coatings, and leave the inside looking worse than when you started.
A kettle descales better when the vinegar reaches bare mineral buildup, not a layer of stale water and floating flakes.
If you're doing a broader move-out clean, this kind of detail work fits neatly into a proper end-of-lease cleaning checklist for Melbourne homes. Small appliances aren't always written into inspection reports, but they absolutely affect the overall impression of the kitchen.
The Step-by-Step Vinegar Descaling Process
You notice it when the kettle starts taking longer to boil, the inside feels gritty, or a white ring keeps coming back around the base. In Melbourne, that buildup can vary a lot by suburb and by the age of the property, so I don't treat every kettle the same. The method stays simple. The soak time and strength are what change.
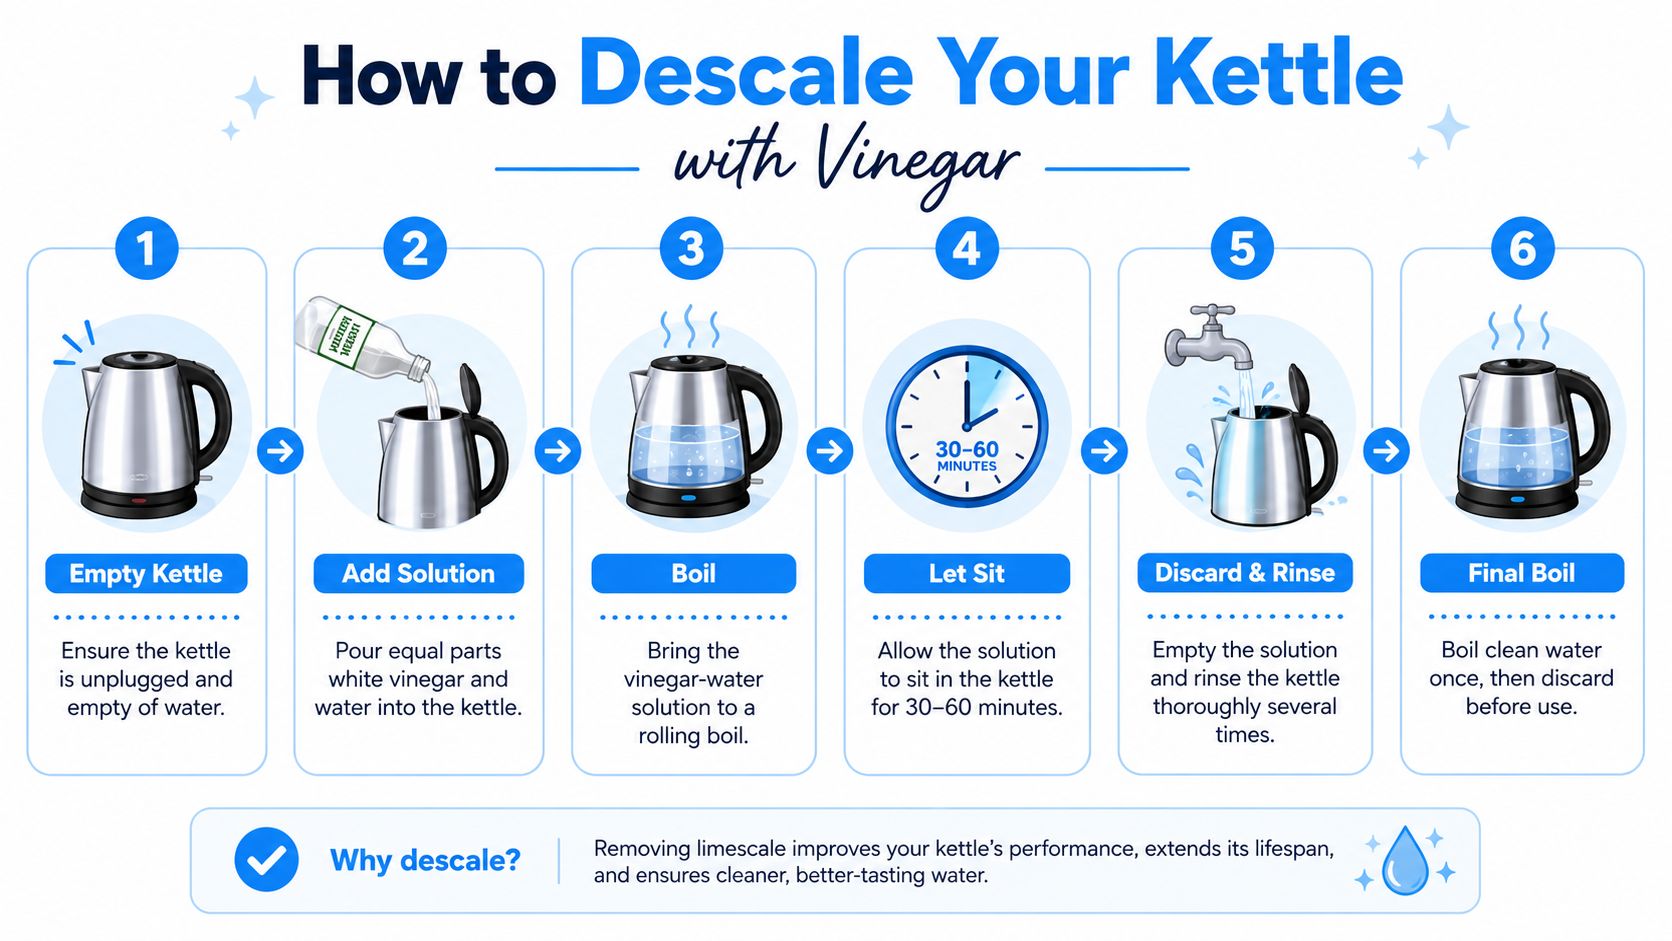
The working method
Empty the kettle fully
Pour out any old water first. If loose flakes are sitting on the bottom, rinse them away so the vinegar can reach the hard scale underneath.Mix the solution
For ordinary buildup, fill the kettle with 1 part white vinegar to 3 parts water. That ratio is a common starting point in household descaling advice, including BBC Good Food's kettle cleaning guide. If I'm dealing with a kettle that has been ignored for months, I still start here. A second round is usually safer than going too strong and leaving the smell hanging around longer.Heat it properly
- For an electric kettle, bring the solution to a full boil and let it switch off.
- For a stovetop kettle, bring it to the boil on the cooktop, then take it off the heat.
Let the solution sit in the kettle
Heat starts the job. Contact time finishes it.
Light film may soften quickly. Thick scale on the base or around the element often needs a longer soak. For stubborn crust, I let it sit until the inside looks dull and softened rather than chalky and hard.Pour it out with care
Tip the solution into the sink slowly. Keep it off painted exteriors, benchtops with delicate finishes, and any electrical base.Check the result before deciding on round two
Run a finger gently along the inside once it has cooled enough to touch. If the surface feels smooth or the remaining film wipes away with a soft cloth, the descale has done its job. If you still have a hard ring or rough patches, repeat the same cycle.
A quick walkthrough can help if you'd rather see the sequence in action:
Electric kettle versus stovetop kettle
The steps are similar, but the risks are different.
| Kettle type | Best approach | Watch for |
|---|---|---|
| Electric | Boil the solution once, then leave it to soak off the base | Keep liquid away from the power connection and never immerse the base |
| Stovetop | Bring to the boil, remove from heat, and let the hot solution loosen the scale | Don't leave it simmering unattended or boil the liquid away |
One mistake I see a lot during end-of-lease cleans is scrubbing too hard, too soon. Freshly heated scale often looks ready to come off, but aggressive scrubbing can mark stainless interiors and coated surfaces. Let the vinegar do the softening first, then wipe gently if needed.
What actually makes this work
Three things matter. The mix has to be strong enough to react with the mineral deposits. The solution has to get hot. Then it needs enough time sitting on the scale to loosen it.
That's why a rushed boil-and-dump rarely gives a good result.
If the kettle still feels rough after the first cycle, repeat the process instead of attacking it with force. The same patience pays off with other scale-prone appliances too, especially if you also need to clean a front loader washing machine properly as part of a bigger kitchen or laundry reset.
If your kettle has a removable mesh filter, take it out after the soak and rinse it separately. If scale is stuck in the mesh, let it sit in a little of the diluted solution for a short time, then rinse well. Don't bend it. Once that mesh warps, it never sits quite right again.
Getting Rid of the Vinegar Smell and Taste
This is the step people skip, and it's the step that decides whether the job was done properly.
A lot of guides act as if descaling ends when the white crust is gone. It doesn't. If your next tea tastes like vinegar, the clean wasn't finished. Independent and manufacturer-style instructions commonly recommend multiple rinses after descaling, including boiling fresh water and discarding it once or twice to clear residual smell and taste, as outlined in these kettle descaling instructions.
The rinse method that actually works
Once you've poured out the vinegar mix:
- Rinse the inside with fresh water
- Fill the kettle with clean water
- Boil it fully
- Discard that water
- Repeat if any smell remains
That boil-and-discard cycle matters more than a quick cold rinse. Cold water removes some residue. A full boil helps lift the last traces that cling to the interior and around the lid.
If the smell is still hanging around
Sometimes the inside is clean, but the lid seal or upper rim holds onto the odour a bit longer. In that case:
- wipe the inside lip and underside of the lid with a clean damp cloth
- rinse again
- leave the lid open so the kettle can air-dry fully
That final air-dry makes a difference, especially with plastic kettles, which can hold smells longer than glass or stainless steel.
A clean kettle should disappear into the background. You shouldn't smell it, taste it, or notice anything odd in the first cup.
The same principle applies to other appliances people half-clean and then regret later. If you've ever dealt with detergent odour or residue in laundry appliances, proper follow-through matters just as much. This is why a thorough method beats a rushed one, whether you're descaling a kettle or learning how to clean a front loader washing machine properly.
Troubleshooting and Maintenance Schedule
Some kettles clean up beautifully in one cycle. Others fight back. Usually that comes down to two things: how long the scale has been building, and what your local water is like.
Across Australia, water hardness varies significantly, which affects how quickly limescale forms. Practical consumer guidance also points to daily habits such as emptying the kettle after use to stop mineral deposits settling in the first place, as discussed in this guide to cleaning a tea kettle and preventing buildup.
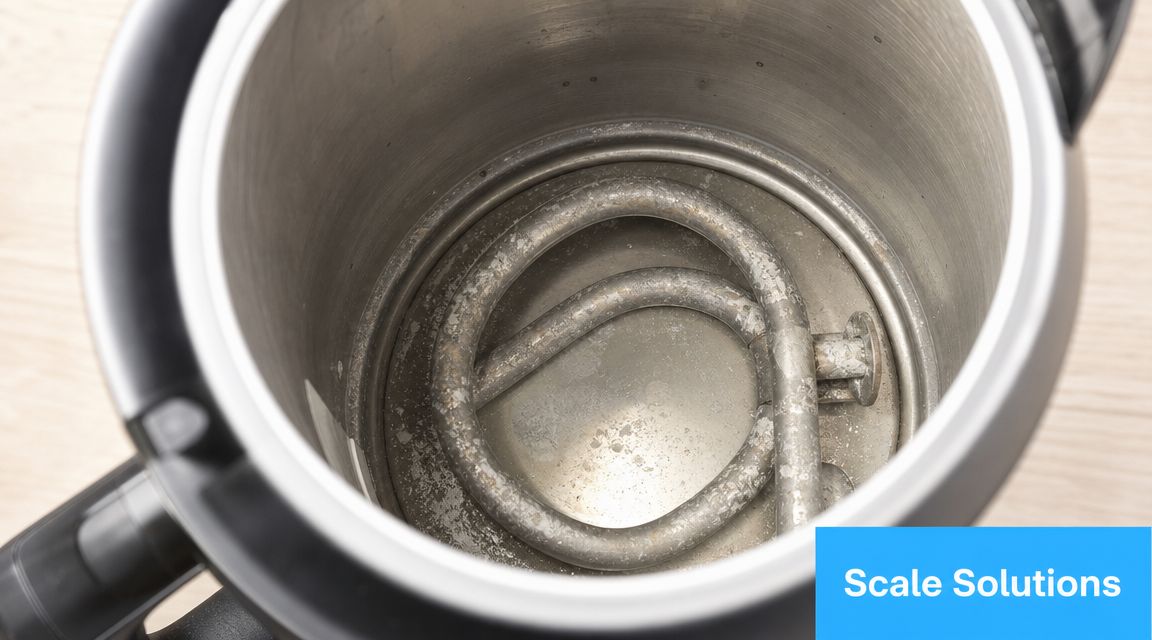
When one descale isn't enough
If you've finished one full cycle and the base still looks crusty or patchy, don't jump straight to scraping.
Try this instead:
- Run a second vinegar cycle if the scale is still solidly attached.
- Give it longer contact time if the first soak was brief.
- Wipe gently with a soft cloth after soaking to remove loosened residue.
- Check the filter and spout area because scale often hides there even when the base looks better.
What usually fails is brute force. Metal scourers, knives, and hard scraping can leave scratches, and those scratches give mineral deposits more places to grip next time.
A practical Melbourne maintenance rhythm
Melbourne homes don't all behave the same way. Some kettles scale up quickly. Others stay fairly clean with only light spotting for ages. Instead of locking yourself into a rigid calendar, watch for these signs:
| Sign | What it usually means |
|---|---|
| White film on the base | Time for a routine descale |
| Visible flakes in poured water | Buildup has gone beyond light maintenance |
| Longer boil time | Scale may be insulating the heating area |
| Flat or odd-tasting drinks | Residue is starting to affect what you're drinking |
If you use the kettle every day, check inside regularly. In harder-water areas, you'll usually need to descale more often. In softer-water homes, you can often stretch the interval. The kettle itself tells you more than a fixed schedule does.
Habits that slow scale down
The best maintenance is boring, which is why it works.
- Empty leftover water after use instead of letting it sit.
- Use filtered water if your household water leaves marks quickly on taps, glass, or shower screens.
- Leave the lid open after rinsing so the inside dries properly.
- Don't keep reheating the same water all day if you can help it.
Cleaner's note: The kettles that stay easiest to maintain are the ones people empty after use. That one habit cuts down the crust that bakes onto the base.
If you're preparing for a final inspection, descale the kettle early rather than the night before. That gives you time for a second cycle if needed, and plenty of time to remove any remaining smell.
Kettle Safety and Alternative Descaling Methods
A kettle can look fine from the bench and still be the appliance that trips people up at inspection time. I see it often in Melbourne rentals. The inside is scaled, the filter is clogged, or the outside finish has been scrubbed too hard and left dull. Vinegar works well in plenty of cases, but it is not the right answer for every kettle.
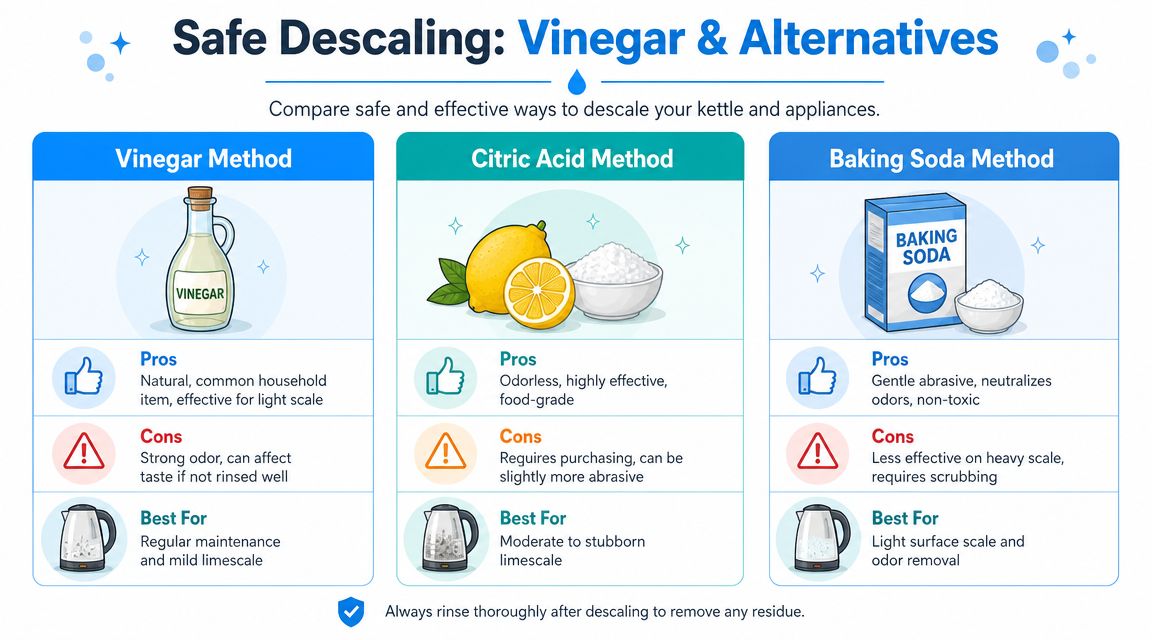
The trade-off is simple. Vinegar is cheap and effective on mineral scale, but some kettles hold the smell, especially plastic models and older units with a lot of internal wear. If the kettle has a delicate finish, a strong odour after rinsing, or care instructions that warn against acidic cleaners, switch methods early instead of repeating the same cycle and hoping for a better result.
Choosing the right method
Here's how I choose between the common options in a real home:
| Method | Best point | Main drawback | Good fit |
|---|---|---|---|
| Vinegar | Cuts through moderate scale well | Smell can linger | Routine descaling in stainless steel kettles |
| Citric acid | Effective with less odour for many households | Needs correct mixing and a separate purchase | Plastic kettles, smell-sensitive households, repeat cleans |
| Lemon juice | Milder smell and easy to use in a pinch | Usually slower on heavier buildup | Light scale or a freshen-up clean |
| Baking soda | Gentle for deodorising and light residue | Weak on hard mineral crust | Follow-up odour control, not heavy descaling |
Citric acid is usually my next pick when vinegar is not cutting it. It still targets mineral buildup, but many people find it easier to rinse away. Baking soda has its place, though not as the main descaler. If the base has a chalky ring or flakes, baking soda alone will usually disappoint.
Material matters
The kettle material changes the safest approach.
- Stainless steel handles descaling well and is usually the easiest to restore.
- Glass makes scale obvious, which helps you catch it early, but it also shows streaks if you rush the rinse.
- Plastic tends to hang onto smell more than steel or glass.
- Coated or decorative exteriors scratch and dull easily if you use abrasive pads or let acidic liquid drip down the sides.
For brand-specific care, check your manufacturer's instructions before trying a different acid-based cleaner, especially if the kettle is newer or under warranty. Breville, for example, provides product care guidance for its appliances: Breville support and product care information.
Basic safety that actually prevents damage
A few habits prevent the common mistakes:
- Unplug the kettle before cleaning or handling the filter
- Keep the power base dry and never immerse it
- Wait until the kettle is cool before wiping or rinsing
- Skip steel wool, harsh scourers, and abrasive pastes
- Rinse carefully around the lid and spout where residue can hide
If you are cleaning for an end-of-lease inspection, do the inside and outside as separate jobs. Descale first. Then wipe the exterior with a soft cloth and mild detergent so you do not splash acidic solution over the finish. I use the same approach with other kitchen detail work, including cleaning a range hood thoroughly before moving out, because the safest result usually comes from treating each surface according to its material.
If vinegar still leaves scale behind after a proper cycle, the buildup is probably beyond a light maintenance clean. At that point, try citric acid, repeat with more contact time if the care guide allows it, or accept that the kettle may have permanent staining rather than removable scale. That distinction matters. Forcing a harsh method can damage the appliance faster than the scale did.
Keeping Your Melbourne Kitchen Sparkling Clean
A descaled kettle is a small job, but it lifts the whole feel of a kitchen. Your drinks taste cleaner, the appliance looks cared for, and you avoid that neglected white crust that stands out immediately on inspection day.
For Melbourne renters, this kind of detail work matters because kitchens are judged as a whole. Benchtops, splashbacks, sinks, range hoods, and small appliances all contribute to whether the place feels properly maintained. If you're already tackling the rest of the space, it helps to pair kettle cleaning with jobs like cleaning a range hood thoroughly before moving out.
The main takeaway is simple. Use the right dilution, give the solution enough time to work, and don't cut corners on rinsing. If vinegar solves the scale, great. If it doesn't suit your kettle, switch to a gentler or less odorous alternative and keep the finish intact.
A clean kettle won't win a bond return on its own, but it does signal the kind of thoroughness property managers notice.
If you're moving out and want the whole property cleaned to that same standard, End Of Lease Cleaning Melbourne can help with detailed vacate, bond, and deep cleaning across Melbourne and greater Victoria. With over 20 years of experience, vetted cleaners, and flexible bookings seven days a week, the team handles the bigger jobs so you're not left scrubbing every last corner yourself.
